Easy Installation
Designed for easy do-it-yourself installation.

Watch our easy installation video
North in-ground trampolines are designed for easy assembly and DIY installation. Over 80% of our customers do the assembly and installation themselves – often with the help of family and friends.
Several customers also hire local gardening or landscaping companies, or bring in a little extra help to dig the hole.
If you are using a landscaping contractor, you can send them the link to this page so they can watch our instructional video or print out the downloadable instructions below.
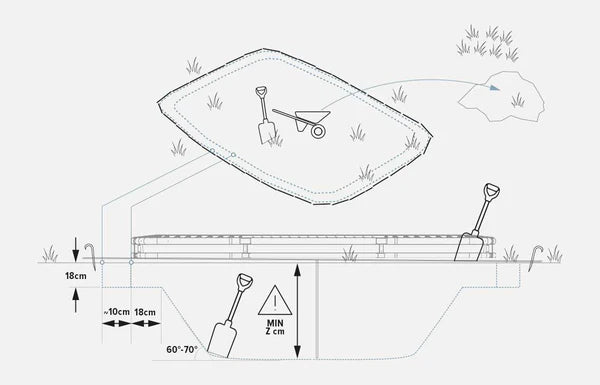
1. Dig a hole
Mark out an area that is a few inches larger in diameter than your trampoline. This will give you some extra space when placing the trampoline in the pit.
Dig out 18 cm of soil evenly over the entire surface. Then dig an inner hole in the center that is about 80 cm smaller in diameter than the size of the trampoline, in a bowl shape, to the depth specified in the instructions. This leaves a ledge on which the trampoline frame rests.
-TIP
It's hard to get the measurements completely accurate - those extra centimeters make it easier. This extra space will be filled back in at the end. Feel free to save some of the excavated soil near the pit for backfilling.

2. Assemble the frame
Assemble the upper and lower sections of the framework, attach the jumping mat and springs, and screw the retaining wall to the outside of the frame.
-TIP
Attach the springs first at the 12 o'clock position, then at 6 o'clock followed by 3 o'clock and 9 o'clock - this provides even tension and makes it easier to assemble the rest.
3. Place the trampoline in the pit
Lift the trampoline into the pit and place it on the ledge so that the frame is at the correct height. Then backfill the gap on the outside of the frame, packing the soil firmly.
-TIP
Use the handle of the shovel to pack the soil as tightly as possible when backfilling.

4. Attach the ventilated edge protectors
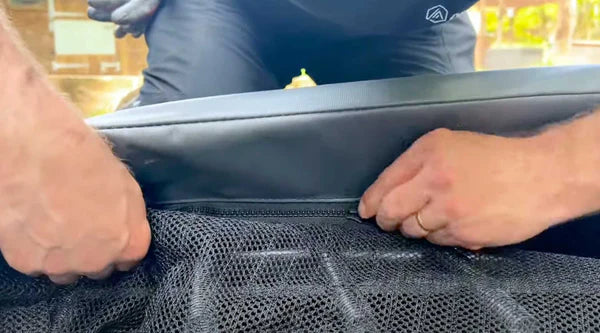
Finally, attach the ventilated edge protector to the frame – now you are ready to enjoy your in-ground trampoline!
-TIP
Use a long screwdriver to press down the elastic bands between the trampoline frame and the retaining wall to ensure the edge protector is securely attached.
5. JUMP!
Enjoy many years of family fun and exercise on your new North in-ground trampoline!
DIMENSIONS OF THE PIT
| Trampoline size / outer pit diameter | Inner pit diameter | Minimum pit depth (Z) |
|---|---|---|
|
Rectangular 300 cm x 190 cm |
260cm x 150cm |
90cm |
|
Rectangular 360 cm x 250 cm |
320cm x 210cm |
100cm |
|
Rectangular 460 cm x 310 cm |
420cm x 270cm |
110cm |
|
Rectangular 520 cm x 370 cm |
480cm x 330cm |
120cm |
|
Round 300 cm |
260cm |
100cm |
|
Round 430 cm |
390cm |
110cm |
Related Articles

Trampoline Safety
The guide in choosing a safe trampoline.

Which Trampoline Shape?
Your guide to choosing the best trampoline shape for you and your family.